Hey there, it’s your coach Jordan Briones.
I want to talk about a shot that I’m personally still working on — and one that I think is one of the most exciting weapons you can develop at the kitchen line.
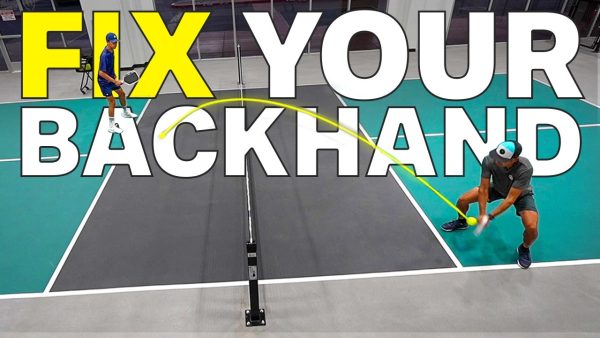
The backhand flick.
If you’ve never tried the backhand flick pickleball, or you’ve seen it on tour and thought it was only for elite players, I’m here to tell you that’s not the case. Anyone can learn this. But like everything in pickleball, you’ve got to understand the mechanics first before you start going wild with it.
Let me break it all down.
Why the Backhand Flick Deserves a Spot in Your Arsenal
Here’s the thing about the backhand flick. It comes back at your opponents fast. Really fast. And because there’s wrist involved, it’s incredibly hard to read.
Most players at the kitchen line are used to defending against predictable patterns — a roll here, a speed-up there. But the flick? It comes from a different angle, with a different look, and by the time your opponent’s brain figures out what’s happening, the ball is already on them.
That’s exactly why this shot is so effective. Not just because of pace, but because of deception. And if that’s not a reason to add it to your game, I don’t know what is.
The Technique: What Your Body Needs to Do to Execute the Flick
Let’s start from the ground up — literally.
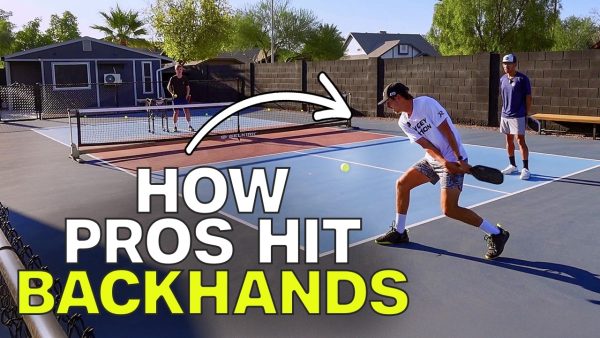
Your Stance Has to Be Wide
Before you even think about the swing on the backhand flick pickleball, get low and get wide. A lot of players stand too tall at the kitchen line and wonder why they can’t reach certain balls. A wider base gives you an extra inch or two of reach into that kitchen, and on a shot like this, that margin matters. Don’t underestimate it.
Your Arm Position and Paddle Angle
Once you’re in your stance, your arm should be fairly straight — maybe a slight bend depending on the ball — extended out in front of you. The paddle face is angled slightly to the side and downward at the start. From there, let the paddle head drop a little before you begin the motion.
Here’s the key detail that a lot of players miss. Your forearm should be tight. Your wrist should stay loose — quiet, even — until the moment of contact.
This is something I had to work through myself while developing the backhand flick pickleball. I was rolling my wrist too early, before even making contact with the ball. What Kaden pointed out to me is that the wrist needs to stay calm and almost feel like you’re about to punch the ball. Then, at the point of contact, that’s when the wrist snaps and brushes up quickly.
Once I made that adjustment, the shot clicked. The difference was immediate.
The Swing and the Finish
The motion itself comes primarily from the shoulder and the wrist working together. Depending on where you’re going with the ball, the wrist either brushes straight up for a shot down the middle, or rolls over the ball when you’re going crosscourt.
And this part is important: your finish should be short and controlled. It ends right around your forehead, in front of your face. Not a big follow-through. Not a swing that takes your whole arm out of position. Clean and compact so you can reset immediately into your ready position.
This is not a shot where you swing big and hope for the best. Precision is everything here.
Where to Actually Aim the Backhand Flick
Hitting the shot is one thing. Knowing where to put it is what makes it dangerous.
Target One: The Right Foot (Middle)
Your default target on this shot should be right at the feet of the player directly in front of you — specifically from the foot up to about knee level. Anything higher than that and you’re giving them too easy a ball to handle. Keep it low, keep it at their feet, and you’re forcing a tough reply.
Target Two: The Left Side of the Body
If you’re going crosscourt, you’re aiming at the left side of your opponent’s body — their hip or that outside left foot. This is a great spot to attack because the crosscourt player, anticipating a middle ball, has to cover that lane.
When you open up to that left side, you’re catching them leaning the wrong way.
Target Three: The Outside Left Foot
The outside edge of that left foot is one of the trickiest spots on the court to defend. The ball is low, it’s wide, and it’s spinning. That combination creates all kinds of problems.
How to Use These Targets Together
Here’s how I think about it. I start by going middle, right at the feet, over and over. I want my opponent to think that’s the only place I can go. Once they start sitting heavy on that middle ball — leaning in, anticipating it — that’s when I open up the wrist and go crosscourt.
The shot only becomes truly dangerous when your opponent doesn’t know which one is coming. So earn that crosscourt by setting it up with the middle ball first.
Two Drills to Start Building This Shot Today
Drill One: Toss Feed
Have a partner stand across from you and toss the ball to your backhand side at kitchen line height. Your only job is to practice the mechanics. Wide stance, forearm tight, wrist quiet, drop the paddle head, then snap through at contact.
Start with five balls. Stop. Rest. Then five more.
I can’t stress this enough — don’t grind this shot into the ground in one session. The wrist is doing a lot of work here, and overusing it will lead to sloppy mechanics or, worse, soreness. Keep the reps focused and the rest intentional.
Drill Two: Live Dink Into the Flick
This one is closer to real gameplay. Have your partner feed a dink, you dink it back, and then they give you a second ball that’s slightly higher and floatier. That’s your flick ball.
Work through the shot from there. As you get more comfortable, you can start playing the point out after the flick — because remember, this is a setup shot, not always a clean winner. You’ve got to be ready for whatever comes back.
One thing I noticed doing this drill: the flick is a lot easier to control when the ball is closer to the sideline, because you have more of the court to work with. When you’re taking it from more central positions, you need to take a little pace off and be more precise with your angle.
The Biggest Mistake Players Make with This Shot
Thinking it’s a winner every time.
Yes, you’ll get some clean winners with the backhand flick. It’s a fast, deceptive shot and it absolutely catches people off guard. But if you go into it expecting an automatic point, you’ll stop recovering after you hit it — and that’s when you get burned.
Hit it with intention. Hit it at the right target. Then get your paddle back up and be ready to play the next ball.
That’s the difference between using this shot well and using it recklessly.
Final Thoughts
I’ll be real with you. This is a shot I’m still developing, but even in the early stages, practicing the backhand flick pickleball already shows me how much pressure it creates at the kitchen line. It forces your opponents to think about one more thing — one more variable. And in a game decided by inches and milliseconds, that matters.
Start with the toss feed drill. Get the wrist timing right. Then move to the live drill and start picking your targets. Be patient with yourself. This shot takes reps to feel natural — but once it does, your opponents are going to have a much harder time relaxing at the net.
Add this to your game. You’ll be glad you did.
See you on the courts,
Coach Jordan Briones